Wi-Fi mesh troubleshooting guide
Set up your Vodafone Super Wi-Fi Mesh
We recommend you download the My Internet Connect app (Android / iOS).
- Connect the power adapter to the mesh device.
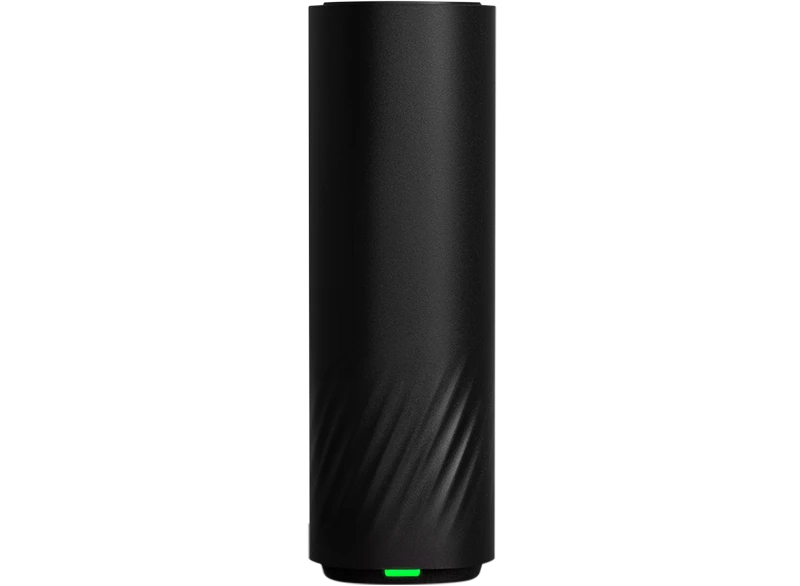
- Check the front LED on the Vodafone Super Wi-Fi Mesh is flashing red.
- Use one of the following options to connect the Vodafone Super Wi-Fi Mesh to your modem.
- Ethernet cable (Takes around 30 seconds): Connect the supplied ethernet cable to the yellow LAN ports on both your modem and Vodafone Super Wi-Fi Mesh.
- QR code (Takes around 5 minutes): From the My Internet Connect app, select ‘Add a Mesh device’ from Settings and Scan the QR code on the bottom of the Mesh unit.
- WPS (Takes around 4 minutes): Press and hold the Pair button on the back of your modem for 3 seconds - the WPS LED on the back should flash green. Press and hold the Pair button on the Vodafone Super Wi-Fi Mesh for 3 seconds- its WPS LED on the back should flash blue.
- When your front LED turns solid green, you’re successfully paired.
For more information on setting up your mesh, check out our nbn Quick Start Guide or 5G Quick Start Guide.
If you connected via ethernet, you’ll need to unplug and move the Vodafone Super Wi-Fi Mesh to a location in the home.
Your mesh units should be placed away from moisture, excessive heat, and devices that can cause interference (like Bluetooth devices, cordless phones, and microwaves).
Adding more mesh units to your network
You can add additional mesh units to further extend your WiFi coverage. Each Mesh unit will need to connect to the network as outlined above.
Quick set-up guide
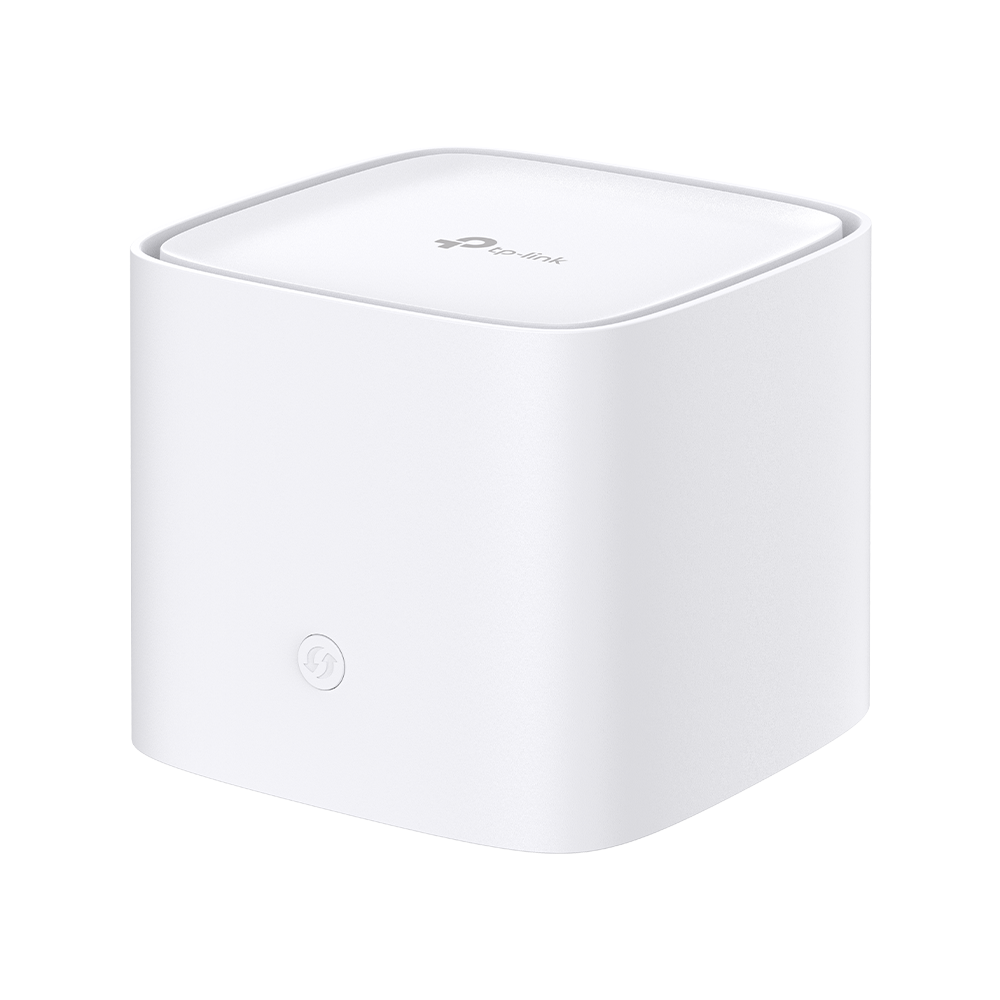
First, connect the hardware:
- Connect the power adapter to the mesh device.
- Connect the LAN port of the mesh device to your modem/router’s LAN port via an ethernet cable. This node will act as your main access point (Main AP).
- Verify the status LED is flashing blue before continuing with the configuration.
Next, set up the network one of two ways:
- Download the Aginet app on Google Play or the Apple App Store.
- Open the Aginet app and log in with your TP-Link ID or create TP-Link ID (you can also choose to manage device without logging in or creating an ID).
- Select "Create a Network" in the Aginet app then "Connect via Ethernet Cable". Follow the steps to complete the setup and connect to the internet. After completing the configuration of the first device, you can choose to add more mesh devices to extend Wi-Fi coverage.
| Method 1: TP-Link Aginet App | Method 2: Web Browser |
|---|---|
|
|
Your mesh nodes should be placed away from moisture, excessive heat, and devices that can cause interference (like Bluetooth devices, cordless phones, and microwaves).
Adding more mesh node/s to your network
You can add additional mesh nodes to further extend your Wi-Fi coverage.
| Method 1: Wireless Connection | Method 2: Wired Connection |
|---|---|
|
|
You can also add more mesh nodes to your network via http://tplinkwifi.net or through the TP-Link Aginet App.
Troubleshooting FAQs
What should I do if I cannot access the web management page?
If the computer is set to a static IP address, change its settings to obtain an IP address automatically. Make sure http://tplinkwifi.net is correctly entered in the web browser. If you still can’t access the page, try a different web browser and/or restarting your device. If this is unsuccessful, disable and then reenable the network adapter you’re using.
What should I do if the mesh device’s status LED remains flashing red?
Place the mesh device close to another configured mesh device until the status LED turns solid blue, white or green, then relocate the mesh device. If it is still flashing red, refer to the following FAQ to reset your mesh device, and then re-add the mesh device to the network.
How do I restore the device to its factory default settings?
While the device is powered on, press and hold the RESET button for 5–10 seconds. Alternatively, log in to the web management page of the device, go to System Tools > Backup & Restore and click Factory Restore. The device will restore and reboot automatically.
What should I do if I cannot access the internet?
Check if the internet is working normally by connecting a computer directly to the modem or the router via an ethernet cable. If it is not, contact your internet service provider. For router mode, log in to the management page of the mesh device, and go to the Status page to check whether the IP address is valid or not. If it is, please run the Quick Setup again, otherwise, recheck the hardware connection – you may need to restart your device and try again.
What should I do if I forget my web management page password?
Refer to the above steps on how to reset your device, then set a new password.
What should I do if I forget my wireless network password?
If you haven’t changed the default wireless password, it can be found on the product label at the bottom of the mesh device. If you have reset your password and can’t remember it, connect a computer to the mesh device via an Ethernet cable and log in to the web management page. Go to Basic > Wireless to retrieve or reset your wireless password.
Vodafone Super Wi-Fi Mesh troubleshooting
The front of the Vodafone Super Wi-Fi Mesh has a quick reference LED. Please refer to the table below for advice on the LED status and its meaning.
| Front LED | Meaning |
|---|---|
| Off | No power or not turned on. Check your Mesh is plugged in or try another power outlet. |
| Solid Green | Pairing is complete and your Mesh is connected to a modem. The Mesh unit is the ideal distance from modem. |
| Solid Orange | Pairing is complete and your Mesh is connected to a modem. The Mesh unit needs to be moved closer/further away. |
| Solid Red | Your Mesh has lost connection to the modem. Check your hardware is plugged in or try another power outlet. |
| Solid / Flashing Green | Your Mesh is Powering up. It will stay solid green for 10 seconds and then continually flashes until pairing begins. |
| Flashing Red | Your Mesh is ready for pairing. |
| Flashing Blue | Your Mesh has started pairing with the modem via WPS. |
While the device is powered on, press and hold the RESET button for 5–10 seconds. Alternatively, log in to the web management page at 192.168.1.1, go to the Mesh tab on the top menu and select Mesh Information, then Reset (MESH WI-FI). The device will restore and reboot automatically.
The Vodafone Super Wi-Fi Mesh will connect to any Vodafone Super Wi-Fi or Vodafone Super Wi-Fi 5G Modem. To change the modem your Vodafone Super Wi-Fi Mesh unit connects to, you'll need to factory reset the Mesh using the method outlined above. Once the unit has been reset you can follow the set-up steps to connect this to the new modem using the My Internet Connect app, WPS or ethernet.
Check if the internet is working normally by connecting a computer directly to the modem or the router via an ethernet cable. If it is not, contact your internet service provider. For router mode, log in to the modem dashboard, and go to the Network Status page to check if the IP address is valid or not. If it is, please run the Quick Setup again, otherwise, recheck the hardware connection – you may need to restart your device and try again.
If you haven’t changed the default Wi-Fi password, it can be found on the label on the bottom of your modem or router. If you have reset your password and can’t remember it, connect a computer to the modem device via an Ethernet cable and log in to the modem dashboard. Each modem has different steps to vie Wi-Fi settings, but it will generally refer to Wi-Fi or Wireless. If you have a Vodafone modem, you should find this advice on the product setup or troubleshooting pages.
Frequently asked questions
The Vodafone Super Wi-Fi Mesh is designed to work best with the Vodafone Super Wi-Fi modems.
While the mesh system supports Easy Mesh standard – allowing it to connect with other Easy Mesh-certified devices – we do not recommend using it with:
- BYO modems
- Other Vodafone modem or mesh units that are not Super Wi-Fi models
Key limitations include:
- Firmware Updates: The Mesh will not receive firmware updates when connected to third-party modems. This may impact future enhancements and security updates.
- Feature Support: Advanced features and performance optimisations may not function as intended with non-compatible modems.
- No Technical Support: We are unable to provide troubleshooting or support for issues arising from use with unsupported modems.
For the best experience and ongoing support, we recommend using Mesh with a compatible Vodafone Super Wi-Fi modem.
Both help boost your Wi-Fi, but they work in different ways. Extenders stretch your signal. Mesh systems surround you with it.
Wi-Fi extender: Think of it as a signal repeater. It grabs the Wi-Fi from your modem and rebroadcasts it to reach further. It’s simple and affordable, but can sometimes slow things down or create a separate network name.
Wi-Fi mesh: This is next-level. Mesh uses multiple devices placed around your home. They all talk to each other and your modem, creating one network with strong signal everywhere. No switching networks, no dropouts – just smooth coverage throughout your home.
Learn more improving the Wi-Fi signal in your home.
If your modem has a LAN port (ethernet), you'll be able to use Mesh Wi-Fi whether you're on a 5G, or NBN Vodafone Home Internet Plan. All Vodafone modems have a LAN port.
This depends on how many devices are connected in your home, the size of your home and how many levels it has. For apartments with dead zone issues, one mesh is generally enough. For two to three bedroom homes or those with two storeys, two mesh units will significantly increase coverage. Large homes over 278 square metres may require a third mesh unit – especially if they have multiple storeys.